![]() +1 929-458-6213
+1 929-458-6213
Animations are fun to watch, aren’t they? But, have you thought about making one by yourself ever? If you have, then choosing the right tool should be the first job to get started. And, among all the software available, Krita is pretty good to work with.
However, when hundreds of editing and visualization applications are available in the vast graphic world, it is quite hard to remain stick to one. So, following that, a question may arise in your mind, is Krita good for animation? And you will get the answer through your scroll.
Table of Contents
ToggleAbout Krita
Krita is an application for photo editing and 2D animation specifically designed for graphic designers, illustrators, creative artists, animators, etc. This company started its journey in 2002 by changing its name from Krayon to Krita and completely became public in 2005.
Krita provides the solution for any photo editing and 2D animation-related works. Moreover, there are stimulations of all kinds in this program. Accordingly, this application uses C++ and Qt Languages to run its operations. And it is available for all operating systems, including Windows, Linux, Mac OS, etc.
Is Krita Good For Animation
The graphic designing software Krita is good enough for all kinds of 2D animation and image works. Krita comes with all the essential features you need to work on 2D animation projects like animation curves, workflow management(timeline docker, animation docker, onion skin docker), and all.
Moreover, the tools you need to prepare an amazing project, like the layering tools, brush tools, shaping tools, and framing tools, run in this application without any glitches if you have the proper setup.
This application applies a process called tweening, which means it recognizes the animation works in mathematical variables, and in this application, this whole process is known as animation curves.
Also, this program offers advanced workflow management features, including the timeline docker and the animation docker. And the onion skin docker. With the timeline, docker helps maintain the time in the animation project so you can insert the audio or tweaking and editing tasks efficiently.
Besides, the onion skin docker is also there. This feature works on the onion’s skin. Moreover, the onion skin docker helps you keep watch on all the frames simultaneously. All in all, this app covers every feature and specification a good animation software should have.
Advantages and Disadvantages Of Using Krita For Animation
Every application has individual advantages and disadvantages, and Krita is no different. Besides the goodness we have discussed earlier, Krita also has some downsides. Here are the notable advantages and disadvantages of using Krita:
Advantages
- Krita offers all its features for free, so you do not have to think about
- It comes with all the essential tools and brushes, ensuring the ultimate flexibility for the artist.
- The advanced workflow management abilities allow managing the work with ease and monitoring multiple frame layers at once.
- Because Krita is an organization, you will get a lot of support from the community about using the application.
Disadvantages
- This application comes with a lot of features, so a bit hard for new users to understand.
- Not suited for 3D animation, advanced image works.
- Sometimes lags if the setup is not proper.
How To Use Krita For Animation (A Beginner’s Guide)
So, the advantages and disadvantages of Krita are now the things you know. It’s time to move on to some work. To help you out with the beginning, we have organized the steps on how to animate on Krita. Have a look:
Step 1: Download And Install Krita
The first step you may proceed with to create an animation with Krita is to get the application. After that, you can download it like any other application from their website. Once you download the application, install it following the usual installing process depending on your operating system.
Note: System Requirements For Krita: 64-bit processor and operating system(Windows 10, macOS 10.13), 2.0GHz+ Quad-core CPU, GPU capable of OpenGL 3.0 or higher., RAM 4GB
Step 2: Create A New Document
Now open Krita and make a new file to work on. Once you open the application, a pop-up will come, and you can create a file by clicking the New File option.
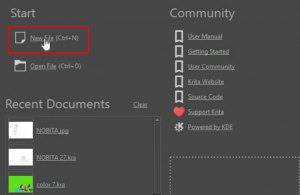
After clicking on the new file option, another pop-up will appear on the screen from which you have to fix the Width, Height, and Resolution of the file you want to prepare. We suggest keeping the Width at 3530, Height at 2400, and Resolution at 300.
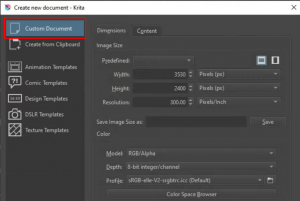
When you set the measurements, a Screen like an image below will appear. This is the document you are going to use to make the animation.
Step 3: Set Up The Tools
You might notice that the document in front of you is somewhat blank. However, don’t worry about that. You have to set the tools first to start working. Go to the menubar at the top and go to the Settings option. A dropdown menu will appear. From that menu, select the option of Show Docker. And all the tools will appear perfectly in the document.
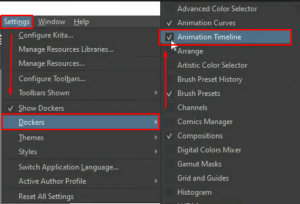
Next, you have to enable some more tools from the sidebar that appear when you click on the Show Docker Option. The tools you have to select are: Animation curves, Animation timeline, brush presets, compositions, layers, overview, palette, tool options, toolbox. All those tools you have to select must. These tools are must need to get the job done.
Step 4: Insert a Picture
After completing the primary steps above, it is time to start working on them. Here, we have organized our steps based on a pre-drawn picture as it is a beginner’s guide. Sometimes it becomes hard for beginners to draw characters by themselves. So starting with a premade sketch is a wise option. So, to start the work, drag and drop your image into the application. Again a dropdown menu will appear in front of you. Choose Insert As New Layer from that menu.
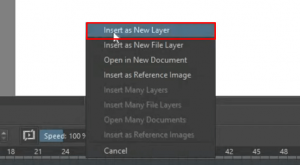
Step 5: Create Layers
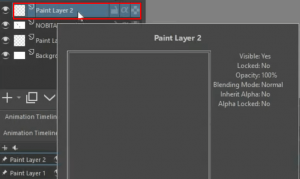
The next step you should approach is creating layers. To prepare a good and smooth animation project, you must create as many layers as possible. The best practice is to create individual layers for every part of the character. Like our character, we have created multiple layers for each part, like the eye, ear, hair, and hand. Etc. To create layers, you must start clicking on the (+) sign in the left bar of the screen, as shown in the picture below.
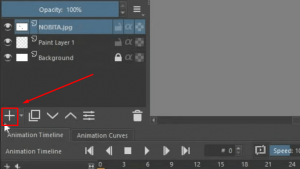
Now, double click on the print layer 2 option, and another layer will be created. Give the new layer a name after the part of the character you are going to work on this layer. We have given the names a right hand, left hand, etc.
Step 6: Draw The Picture
Once you are ready with the layers, it is time to start drawing the picture. Like to remind you that we have just started working over a premade picture that you can’t animate. So the drawing of the picture is a must. To start drawing, select the tool shown in the screenshot below. After that, zoom in on the part of the character you want to draw and start drawing following the pointer, which is marked in the screenshot below.
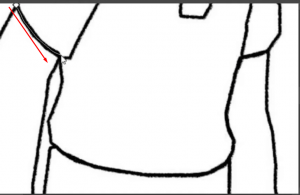
And following the process, complete the drawing. You will notice when your marking ends in the same pot it started, there will appear a red dot.
Step 7: Proceed With The Animation
Therefore, it is time to jump to the animation part. You must be focused and follow every step to get the best results. To start the animation, jump to the animation timeline, which you will find below in the document. You will notice each layer you created under the animation timeline docker.
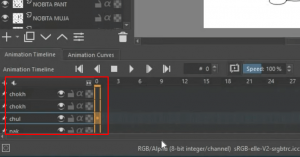
Now, from the upper part of the animation timeline, remove the first image on which we drew the picture, as mentioned in step 4.
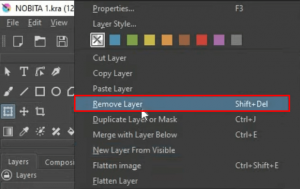
Then select all the layers from the bar of the layers as shown in the screenshot below. Now click the right button on the mouse and select group from there. Next, another dropdown menu will select the quick group option, and all the layers will come under a group.
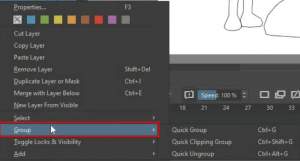
Following this, it is time to start the animating process. To start, you must go on the bar below, under the animation timeline. You will notice a different number of frames in the sequence of 2,4,6,8,12, and the following. Here you have put attention on.
Select the frame number, and we prefer 6, as shown in the image below. Then, go to the layers in the right bar and click on the group you created earlier. There you will see each layer. From those, select each one and click the mouse’s right button pointing to the layer. Another new menu will appear. From there, select the create duplicate frame option. And repeat it for each layer under the frame number. And repeat the process for each frame you want. Remember, the animation will be smoother as many frames as you add.
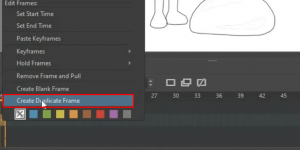
After you prepare all the frames with each layer as shown, it is time to let the character move. So, you have to start from the first frame:
- Select the frame.
- From the tools on the upside of the right bar of the document, select the option to transform a layer on selection.
- Get your pointer over the character and click.
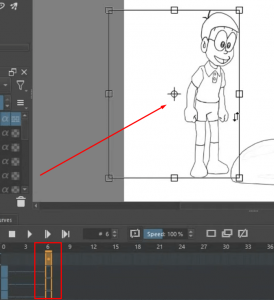
A rectangle shape will appear. Select the area of the character you want to move with the rectangle and move the character a bit. And repeat the process in all the frames.
Finally, when you are done with all the frames. Press the play button beside the animation timeline. If everything is okay you will see the animated video you’ve worked on.
Step 8: Save The File
In the end, after you get the review of the video, you have to save the file. To save, click on the Menubar file option on top of the document. Then, select the render animation option from the dropdown menu.
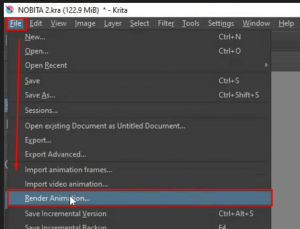
Beforehand, another pop-up box will appear, and you have to select the video option from there and fix the file location to save. In the end, select okay from the box, and your video will start rendering and get saved.
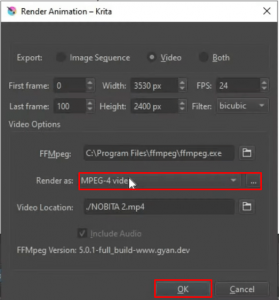
Note: You might not get the mpeg4 option when saving the file. You have to go through a bit of process to get the option and this link will help you.
Conclusion
So, you know every aspect that makes Krita a good graphic application for animation. Also, the beginner’s guide we have prepared will help you to get started on your first 2D animation project. Yet, not everything is 100%, and so is Krita. Also, this is free software, so you will not get everything related to graphics. But for beginner-level works and efficient 2D animation works, Krita is good enough.
Related Posts

