
Unlike other software, FPS(frames per second) settings in Blender are located far beneath the initial interface. This is why you might find it challenging to learn how to change FPS in Blender as a newcomer. We have listed all the steps for changing frame rates to save you from wasting hours searching.
Through our steps, you will be able to change FPS settings for both render and playback. As the options are located on different panels, we had to create separate steps. Moreover, changing frames has numerous upsides, and we will explore them at the end. Let’s get in.
Let’s discuss the steps you will need in order to change FPS in Blender. These are the core of changing the FPS within Blender. Even though the version might change, the guidance will be similar all the time.
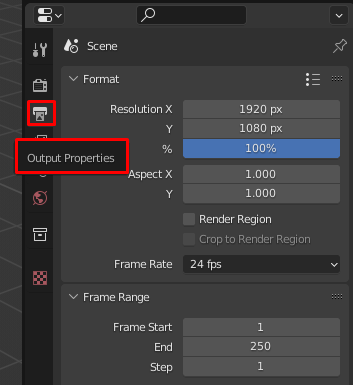
Step 1: At first, you need to click on the “Output” properties icon on the right side of the interface. The icon looks a lot like a printer.
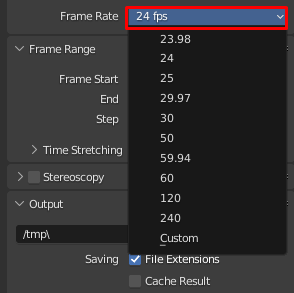
Step 2: At the following screen, you will get an option named Frame Rate. Click on the current FPS number, and a drop-down menu will appear. You could choose from the options or click on the Custom option.

Step 3: Once you click on the Custom, the FPS option will appear. On the FPS option, you could enter your desired Frame Rate. By default, Blender's frame rate is 24.
Related: How To Change FPS In Maya
You might want to change only the FPS on the viewport playback. We have found the solution. Meanwhile, it’s better to remember that it will only change the playback FPS, not the actual render.
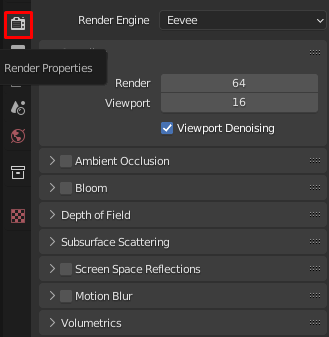
Step 1: Click on the Render settings option from the sidebar. The Icon looks a lot like the back of the digital camera.
Step 2: Now, check the option named “Simplify”. By default, it’s not turned on in Blender.
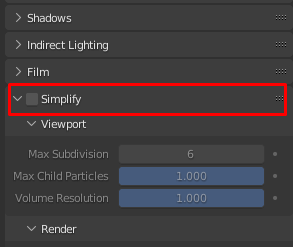
Step 2: Afterward, you will get a bunch of new options to tweak. Now go to the “Viewport” section and lower the “Max Subdivision” value to make the playback fps faster.
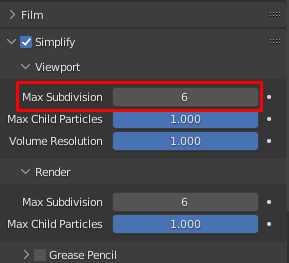
Note: It reduces the subdivision surface of the model, making it lighter and faster in the viewport.
You have many reasons to change FPS (frames per second) both in render and the viewport. And it’s one of the most common tasks every animator in Blender does in their workflow. Below are some of the key reasons why animators prefer to change FPS:
As you start working on a brand new Blender unit, you will see the same frame rate. To be specific, 24 is the default FPS in Blender. Hence, it’s the perfect frame rate for typical animation projects. Each user can change the default FPS both in render and playback.
You have a feature called time-remapping within Blender. For example, if your current frame rate stands at 30. Go into the time-remapping option and set it to 30:70. Perhaps you need to follow the formula 70/30*(the older end frame) to find the new end frame number.
The term 60 FPS means the render will process 60 individual frames in a single second. As a result, the total time will consist of a single second. Therefore, you need to expand the render time on the timeline viewport of the Blender interface.
Getting familiar with how to change FPS in Blender is way more crucial than any other aspect. Because without perfect adjustment, you won’t be able to create better animation output. Perhaps it will provide you with an advantage in creating the animation without any issues.
Either way, the Blender interface is a bit advanced, and the FPS setting is far beneath the surface. Guides like the following one are the only way to tweak things in a render. So, take the proper time and change the frame rate of your project file.
2
3
4
April 7, 2026
7
April 3, 2026
8
April 3, 2026
9
